
In response to faculty feedback, spring Moodle courses will remain accessible to students to finalize the increased number of Incompletes from spring. Information Services will not automatically hide Spring 2020 Moodle course sites until the seventh week of Fall Quarter 2020. They will be moved to the Past Course Sites category, but this does not alter their availability. All instructors are welcome to hide their sites earlier if they wish.
Category: Faculty Resources
We Stand with You. We Support You.

To our campus community:
As many of you know, our department typically publishes content related to technology resources, system maintenance, and user education of our tools. We’re reminded that questions of technology, digital access, and data are not separate from social justice and racial equity. We must further admit that, although we try to be as helpful and proactive as possible, we have the privilege to wait for our users to come to us.
Essentially, you tell us what you’re trying to accomplish—what you need. However, with the unjust events that have transpired and continue to occur in our country it is our time to come to you. To our Black community we understand that there can be no peace without justice, and we stand with you, we support you.
Sincerely,
The Information Services Staff
Resources to Be an Ally
Please refer to the list below to support the Black Lives Matter movement and the victims of these heinous crimes. Also recognize this is the first step to becoming an ally and it is critical that you continue to educate yourself, to listen, to watch, to raise your voice, to engage, and to act.
- Black Lives Matter Toolkits + Reports
- Black Lives Matter, What Matters Web Series
- Guide to Allyship
- Kalamazoo College Library post on Becoming Better Allies: Anti-Racism Resources
- Justice in June – A schedule of learning resources for allies and what to do for 10, 25, or 45 minutes/day by Autumn Gupta and Bryanna Wallace.
- 115 Ways to Donate in Support of Black Lives and Communities of Color
- Kalamazoo College Praxis Center for news and articles on race, class & immigration
- What can I do to help in Kalamazoo?
Microsoft Teams Now Supports Up to Nine Cameras
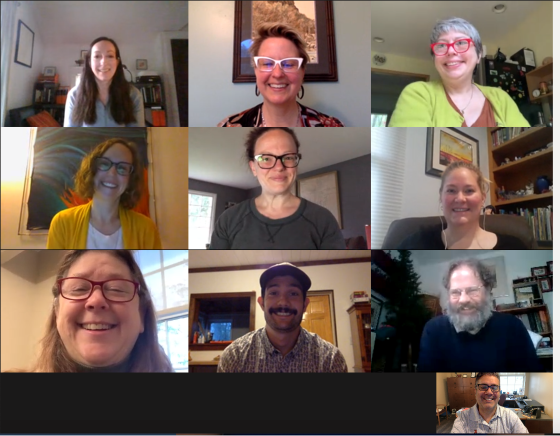
We’re pleased to share that Microsoft has successfully implemented a 3×3 camera view in Teams and this is now available at Kalamazoo College!
The ability to view nine participants simultaneously should be activated by default for all Calls participants. Seeing additional participants has been a popular request, and we hope this will encourage more users to explore Teams as a video conferencing, chat, and collaboration tool.
Microsoft has expressed an intent to expand beyond nine cameras as part of their roadmap but not offered a target date. We will keep users updated on any new features that enhance Teams functionality.
For more information about using Teams Calls, please visit the Videoconferencing page on the Information Services website.
Additional Information on Teams
Are you new to Teams and need further instruction on how to use this tool effectively? View our Microsoft Teams Tour video or visit the Microsoft Teams page for more specific information and instruction.
Faculty
Would you like to talk more about using Teams with students in class? Feel free to email the Educational Technology Specialist, Josh Moon at josh.moon@kzoo.edu.
Staff
For questions on using Teams for departmental communication and collaborations visit the Microsoft Teams page or the Help Desk at HelpDesk@kzoo.edu.
Students
Need help on using Teams? Visit the Microsoft Teams page or email the Student Computer Consultants at StuTech@kzoo.edu, Monday – Sunday from 8 a.m.-10p.m. EDT.
Introducing Tech Talk!

Information Services would like to announce the revival of our video series, Tech Talk!
Tech Talk is the Information Services channel on Microsoft Stream answering good questions and providing even better solutions. On the Tech Talk channel you can watch tutorials showcasing the technology offered at Kalamazoo College. All K College faculty, students, and staff have access to use Microsoft Stream with their campus Office 365 account. Popular videos currently on Tech Talk include:
Suggestions
Do you have a suggestion for a Tech Talk video? Feel free to email the Web Services Specialist, Katrina Frank at katrina.frank@kzoo.edu.
Safeguarding PII While Working From Home
Personally Identifiable Information (PII) is information that, when used alone or with other relevant data, can identify an individual. Many employees work with PII about students, staff or alumni. Find a more detailed definition of PII and Kalamazoo College’s policy for protecting it on the IS Policies page.
- Follow the steps in our earlier post “Tips for Working Securely from Home.” In particular, employees should be extra vigilant when working from home against social engineering attacks. It might be harder to tell if that email from your supervisor or colleague is legitimate when you are not located down the hall from them. If you receive a request for PII, we suggest that you get verbal/video confirmation from the requester.
- Try to minimize how much PII you work with from home.
- Never send PII through email
- If you need to work with PII, the best way to keep it secure is to store it on a computer that is on campus under IS management. This would include the KFiles server. We do not recommend storing PII on cloud-based services or on your device at home.
- To work with PII, you can also use remote access via our VPN to connect using Remote Desktop to a campus computer. Another advantage to connecting with remote desktop is that if your home internet connection is unstable, your work is preserved on the campus desktop if you get disconnected.
- If you have further questions or need help getting set up for remote access, please contact the Help Desk.
Update to Faculty
The Information Services Team has worked to produce extensive content to support online learning and collaboration during Spring Quarter. You can follow our COVID-19 Online Learning Plan Updates and Faculty Tools pages. Recent posts include information about virtual computer labs, tips for working securely from home, and student writing in Moodle.
What’s Working
- Response to Microsoft Teams has been strong. We currently support over 425 various Teams including courses, committees, departments, and more. We intend to continue to refine and expand support for Teams in the future.
- We’ve welcomed faculty new to Moodle for their asynchronous course communication and supported returning faculty in developing further skills. The number of Moodle courses is up 35% from Spring Quarter 2019.
- Early adoption of Microsoft Stream has provided another robust platform for video communication and eased the burden on other hosting sources.
- Classes that require software that is available only in on-campus labs can now access them remotely. This has maintained learning opportunities with programs like SPSS, MATLAB, and ArcGIS that would have been otherwise lost.
What’s Not Working
Moodle Supporting Large/Long videos
Moodle users began experiencing “500 – Internal server error” messages last week. We believe the major cause is lengthy videos hosted directly onto Moodle. Therefore, we have expanded our support of Microsoft Stream and encourage comfortable users to post to YouTube when appropriate. Currently, we are asking faculty to refrain from posting any videos longer than five minutes directly to Moodle.
Stream and Privacy
Many course videos of student introductions and instructor content are currently posted as available for anyone at the College using Stream. It is important that users not inadvertently share with larger audiences than they intend. Please know that the Quick share option available via the Stream phone app publishes video with the permission Allow everyone in your company to view this video. For more control, disable Quick Share and then use Save as draft. For further discussion of permissions in Stream, please visit the Video Streaming page of the IS website or watch our video overview.
Choice of Videoconferencing platforms
We have received extensive feedback about user experiences in Zoom and Teams. We know that Zoom’s expanded display of video and some of its scheduling features are appealing. However, we are also aware of increasing concerns over “Zoombombing” and the challenges of conducting College business in unsupported platforms. Microsoft recently posted that they are working to accelerate their implementation of increased number of concurrent video displays in Teams. Information Services believes that the benefits of using a more secure tool that is integrated to our software architecture is the best choice. We’ve published a post titled Moving from Zoom to Microsoft Teams that addresses some of the most common questions and attempts to provide solutions for success.
Teams Calendar Event Feature
Some Microsoft documentation references “Meeting” and “Calendar” tabs inside Microsoft Teams. These are integrations that are not available at the College. Windows users with Teams and Outlook 2013 or later versions can use Outlook to schedule Teams meetings. For additional strategies on initiating and managing calls, please refer to Moving from Zoom to Microsoft Teams.
Moving from Zoom to Microsoft Teams
Microsoft Teams is our institutionally supported videoconferencing application and offers many collaboration features. Due to its integration into the College’s technology infrastructure and the requirement of login credentials, it is more secure than other clients that are increasingly targets of disruption and attacks. We do recognize that many users are comfortable with certain features in Zoom and are hesitant to sacrifice them by moving to Teams. We would like to offer some support and practices that might make this shift easier.
Easy ways to schedule a meeting
If you need to schedule a meeting, set up a Channel on your Team labeled “Meetings.” This becomes the consistent site to begin Calls and the online meeting spot.
There are multiple benefits to this approach:
- Everyone knows where to go at the appropriate time (like a physical classroom).
- The Channel’s “Meet Now” button allows you to quickly initiate meetings and get started.
- If you record or otherwise add Meeting-specific content, it avoids clutter on your other Channels.
Managing a Call with four concurrent videos
The ability to see all participants in a call is one of the most popular features that Teams currently lacks. While Microsoft has suggested that they are quickly working to introduce this, productive calls can still be held without out this functionality. Some tips include:
- Encourage all participants to mute their microphones. This is a generally helpful practice in videoconferencing to avoid crosstalk and ambient noise. In turn, encourage individual users to unmute and interject when they would like to comment or contribute a question. “Excuse me, Professor, can I ask a question….” It can be that simple even without a visual. Microsoft Teams will automatically transition one of the video feeds to the person who is speaking.
- Utilize the Call’s accompanying Chat conversation to draw out questions and commentary. It can be difficult to facilitate conversation and monitor the Chat simultaneously. Give students responsibility for helping to bring questions and comments into the Call from the Chat.
- Set an agenda for your Meeting Call. Even with four users, having a free flowing conversation can be difficult in an online conference call. Help everyone know when to participate and what the expectations are by sharing an agenda ahead of time if appropriate.
- If the audio and video quality of a call is inconsistent, encourage some users to turn off their camera to improve the experience. Also, be aware of using too many features at once during a Call that might make it increasingly challenging for some students to participate.
Such techniques have been successful in navigating Teams Calls with two dozen faculty members and is the weekly model for Information Services Computer Meetings that include twenty participants. It can be done!
Hosting Office Hours in Teams
The lobby feature of Zoom to form a meeting queue is helpful, but it has also become one of the prime vulnerabilities for introducing unwanted participants. With Microsoft Teams, the certainty that the user is who they claim to be is much higher.
To facilitate hosting Office Hours with Teams, try this:
- Let students knows when you’ll be on Teams with your status set as available and welcome them to contact you. You can set a status message in your profile to make clear your preparation to receive calls.
- If you are busy in a Call with a student, encourage students to send you a Chat message to let you know they are waiting to speak with you. Quickly acknowledge them and let them know you will be with them shortly. If you wish to just use the text chat, experiment with balancing multiple Chats at once as you are comfortable.
The College is committed to continuing to support Microsoft Teams in the future and exploring more ways to take advantage of its collaboration and communication features as well as to introduce new functionality. If you’d like to talk about how to make the resource work for you, there are multiple avenues of support. We have the videoconferencing and Microsoft Teams pages on the IS website. A new Tech Talk channel is now on Microsoft Stream and you are always welcome to contact us for personal support.
Special Software Availability for Distance Learning
Some courses require students to use specific software products, such as SPSS, Atlas.TI, ArcGIS, MATLAB, and Stata. The College licenses these packages for use in computer labs, so students do not necessarily have to purchase and install the software on their own computers.
To accommodate distance learning during Spring 2020, the College has created an online computer lab with access to the software required in courses this term. At the same time, we understand that students will have a better learning experience if they have access to a desktop computer where they are able to install and use the required software.
Information Services has gathered these resources from the various companies who are offering special licensing at this time:
Adobe Creative Suite
Adobe is providing us with temporary licenses to access Adobe Creative Cloud desktop apps at-home, at no additional cost, so students and faculty can continue their learning.
Things to know before installing:
- Be sure to use your long form email address (Jane.Doe16@kzoo.edu) to get properly redirected to a Kalamazoo College login page.
- If you already have a personal Adobe ID that uses your K email, you will be prompted to select which account when you attempt to sign-in; select the “Company or School Account” option.
Follow these steps to install Creative Cloud apps.
ArcGIS
The College has received a limited number of temporary Student Licenses from Esri. Please contact HelpDesk@kzoo.edu to sign one out.
ArcGIS Desktop Installation Instructions
Step 1: Download ArcGIS Desktop (ArcMap) software from ESRI Student site:
- Visit https://www.esri.com/en-us/arcgis/products/arcgis-desktop-student-trial and sign in with your Esri account.
- Note: If you do not have an account, please create one by clicking the “I need to create a new Esri Account“
- Enter your EVA code and hit Activate.
- Look for the preferred version (10.3.1-10.7.1) of ArcGIS Desktop and click on it
- From the list of software to download, select ArcGIS Desktop (ArcMap) or ArcGIS for Desktop
- Click on Download
Step 2: Installing ArcGIS Desktop (ArcMap):
Once the download is complete, the installation setup for the ArcGIS Desktop will usually be stored in your Downloads folder.
- Open your Downloads folder.
- Double click on the installation setup of ArcGIS Desktop (.exe) to begin file extraction
- Once the files are successfully extracted, hit Close and the installation wizard will begin
- Hit Next, Accept the Agreement, choose Complete installation type, and hit Next throughout the process and finally hit Install
- Hit Finish once installation is complete
Once the ArcGIS Desktop (ArcMap) software has been installed on the computer, please follow the steps provided below in order to authorize the software using your EVA license.
Step 3: Authorize the ArcGIS Desktop (ArcMap) EVA license:
- Go to Start Menu > ArcGIS folder > launch ArcGIS Administrator (right click and run as Administrator).
- Click the Desktop folder (located on the left panel)
- Choose the license level. Advanced (ArcInfo) Single Use option.
- Click Authorize Now to start Software Authorization Wizard.
- Choose the default option, “I have installed my software and need to authorize it” and click Next.
- Select “Authorize with Esri now using the Internet” and click Next.
- Enter/update personal information and click Next.
- Select organizational details and click Next.
- Enter the license number EVAxxxxxxxxx for ArcGIS Desktop and click Next.
- On the dialog box for extensions to be authorized, choose “I do not want to authorize any extensions at this time” option and click Next. Extensions are already included with the license
- Ignore the evaluation features and click Next. The option to evaluate features is not needed as your license already have the extensions.
- Hit Finish once license authorization is complete
- Check for license availability by clicking on the Availability folder (located on the left panel) and ensure the license is available.
- Launch ArcMap by going to the Start Menu, look for the ArcGIS folder and select the ArcMap.
- Once the ArcMap is successfully launched, go to the Customize tab and click on the Extensions.
- Make sure to check all the boxes for the extensions that have been authorized are for use.
MATLAB
Mathworks has arranged a special license that students can use on their own computers through June 30, 2020. This license allows students to use MATLAB Online via any web browser or to install MATLAB on their own desktop or laptop. To obtain a license, create a MathWorks Account using your kzoo.edu email before either starting MATLAB Online or downloading the desktop version.
SPSS
IBM is extending the SPSS Statistics Subscription Trial through June 15.
Stata
Stata has provided a temporary license (through June 1) free of charge for students. Please contact HelpDesk@kzoo.edu for the activation key.
Download the software here using the credentials you receive from the Help Desk. Find Installation instructions here.
Forums and Other Options: Student Writing in Moodle
One of Moodle’s strengths is the ability to collect student writing online. There are a multiple Moodle Activities designed to accomplish this, and this post is going to discuss the key features and settings of three: Forum, OU Blog, and Assignment.
Forum
In online learning, the Discussion Forum is one of the most common tools. It is a great place to start for a faculty member who wants a simple space for students to discuss topics and respond to readings. There are more naturally engaging and dynamic tools but with strong prompts, clear expectations, and an engaged facilitator, a Forum can be a solid foundation for communicating asynchronously in an online class.
Key settings:
Forum Type: Standard forum for general use – this is the default. Students can make new posts and replies to their classmates without restriction. It is what most instructors will want to use.
Note: a “Q and A Forum” is misleadingly named. This requires that each student post a discussion topic before they can see any posts by other students in the Forum. This is a special, restrictive format.
Subscription and tracking – This determines whether users receive email notifications about Forum activities.
Note: Subscriptions can be managed by users both at the level of the entire Forum and individual discussion posts.
- Optional subscription (default): users can choose if they wish to subscribe to a Forum or Post but are not subscribed by default.
- Forced subscription: all class participants receive email notifications and cannot opt out. This is the setting for the Announcements Forum.
- Auto subscription: the reverse of “optional subscription.” Everyone is subscribed by default but individual users can remove their subscriptions.
- Subscription disabled: no one can subscribe for email notifications in Forums.
Grading & Ratings – this determines whether instructors are able to directly grade a Forum. They do this by assigning a “Rating” system for posts. This can be confusing and we recommend either 1) creating a discussion forum as a separate grade item in the grade book and/or 2) using Course Completion and Activity Completion to automate confirming participation. For an explanation of Course Completion, please watch the portion referring to completion tracking on the Conversation about Moodle Forums video.
There are additional settings, but a “standard forum for general use” with clear instructions in the description field will create a flexible discussion board for all course participants. If this is the functionality that an instructor needs, no other setting modifications are necessary.
If you’d like to view an extended overview about the use of the Forum tool in Moodle, you are welcome to access the video, A Conversation About Moodle Forums recorded between Dr. Josh Moon and numerous faculty members on the topic (you may be asked to enter your K ID and password).
OU Blog
We have replaced Moodle’s built-in blog tool with a preferable alternative designed by Open University. It works like a standard web blog. Posts can either be visible to other participants in the class or function like a private journal (visible to the instructor). The OU blog supports comments by readers on visible blogs.
Key settings:
Individual blogs:
Separate individual blogs – each student’s post is only visible to the instructor and the writer.
Visible individual blogs – blog entries are open to other participants and can receive comments.
No (blog together or in groups) – one blog without options to sort or view by author.
Maximum visibility: For publicly available blogs, there are preferable options to Moodle. “Visible to participants in the course” should be chosen in most instances.
Assignment
This is the Moodle dropbox to receive files from students. Moodle can support student submissions of most file formats and individual files up to 200 MB (larger files can be sent to faculty with OneDrive). It is a valuable organizational tool to avoid submissions via email.
Key settings:
Submission types: How do you want students to submit? Upload files or simply type into a text box? How many files can they submit? Are there only certain accepted file types for this assignment?
Feedback types: How do you want to respond to students? Do you want a comment box? Do you want to upload a file with comments?
Notifications: Do you want an email notification when each student submits their work?
When submissions are complete, faculty can download all files as a .zip folder by selecting Download all submissions in the gear wheel settings.
Which should I use?
The answer to this question depends on the nature of the students’ writing and who you wish to have access to it.
Forum: shorter posts, more balance between original posts and replies.
Blog: longer (1-2 pages) writings where the point of emphasis is the original post. Can either be private to the instructor or readable by classmates.
Assignment: extended, refined writing. Submitted as a file attachment that is only visible to the instructor.
Moodle can be a valuable tool to facilitate the asynchronous writing of your students. If you have any questions on how to use these Activities, please contact Josh Moon, Educational Technology Specialist at Josh.Moon@kzoo.edu.
Tips for Working Securely from Home
One of our goals is to enable faculty and staff to work as securely as possible from home.
Our partner in security awareness training, SANS, offers these five steps, also available in more detail as a Top 5 Tips for Working Securely from Home download (PDF, 1.04 MB).
1. YOU are the best defense against social engineering attacks
Don’t let attackers trick you into giving them your login information or personally identifiable information (PII). They’ll try to do this by creating a sense of urgency, posing as tech support or someone you know. Information Services will never ask you for your password.
2. Secure your wireless network
- Change the default administrator password
- Enable strong security by requiring a password and enabling encryption
- Make the passwords strong
3. Be smart with passwords
SANS recommends using a multi-word passphrase to ensure a strong password with many characters. Use different passwords for your KNET account and other accounts, and manage all the passwords with a password manager such as KeePass.
4. Keep software updated
Ensure your computers and mobile devices install software updates promptly, enabling automatic updating whenever possible.
5. Keep kids and guests off your work devices
They can accidentally erase or modify information, or, perhaps even worse, accidentally infect the device.